Atom 2 and NS2
Why use Atom 2 and NS2?
NS2 already provides one of the best interfaces for arranging a song. Using a high level zoomable view of your song you can easily manipulate clips of MIDI on a timeline. Adding Atom 2 to NS2 means you can harness this superior song arrangement capability and combine it with the superb clip launching and MIDI editing capability of Atom 2.
* Reuse of musical phrases in your timeline. Your musical phrases are stored as patterns and your song is built by starting these patterns. If you don’t like a phrase which is repeated 20 times in your song you change it in one place and it automatically changes everywhere else. I only want to store one copy of my chorus and I also only want to store one copy of the music that makes up my chorus and Atom makes that possible, even inside a DAW. All my DAW does now is arrange when things start and end, the music is decoupled from the timeline.
* Ability to quickly try different patterns together. When you create a pattern you are throwing together notes that you like the sound of. When you arrange a song then you are throwing together patterns that sound good in a particular order. Clip launching lets you experiment with this in a much more free way than shifting chunks of MIDI around a timeline.
The utility provided by NS2 clips means you can store whole named sections of clip launch instructions together logically and move them around the timeline. You also benefit from the ability to alias clips so you can have one clip that can be repeated throughout your song yet you only need to change one of the clips to change them all. This way you really are repeating the minimal amount of data to arrange your song.
Adding Atom 2
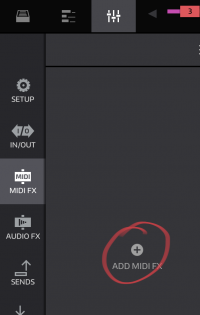
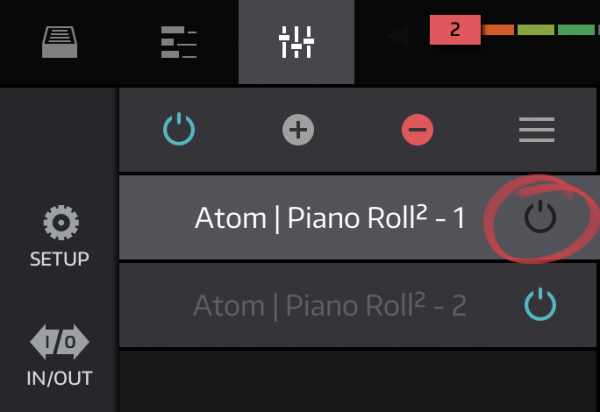
You should add Atom 2 as an External MIDI FX plugin:
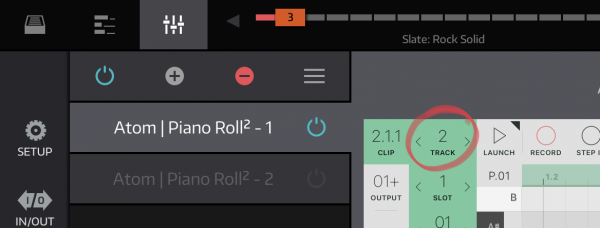
If you intend on recording MIDI rather than manually adding notes in Atom then I recommend that you create a second instance of Atom 2 for each track. This will be explained in more detail later on but you will use the second instance for recording and the first for triggering:
Edit/Note I no longer use a second Atom instance in my workflow (see Advanced Topics section) but I have left this in case others prefer the way of working.
Initial setup
You can trigger Atom 2 patterns in a number of ways. NS2 limits the usable trigger methods to velocity and note since program change and continuous controller MIDI are blocked by NS2. For the purposes of this tutorial we will use note triggering as it is not easy to accurately set velocity in NS2.
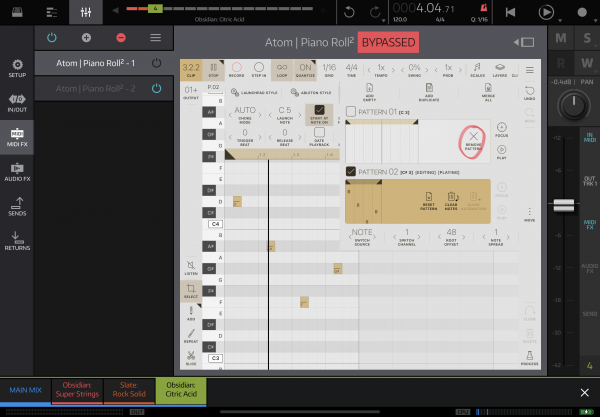
Open the first Atom 2 instance and set it up so that it looks like this (click to zoom):
How you set “Launch Note” and “Root Offset” is up to you. With the suggested configuration, “Pattern 1” is triggered by NS2 keyboard note C2 (48) and the trigger note is set to C4 (72). Due to octave naming differences, these are labelled C3 and C5 in Atom 2. I chose this range for the following reasons:
- It is nearer the centre of the keyboard
- It gives you access to 24 patterns per track
- It uses the same default range of notes as Slate (see Advanced Topics for how this may be useful)
If you typically use fewer patterns per track then use your own defaults but be aware that if you run out of pattern slots then you will need to edit all existing trigger MIDI notes on that track to move the controller note to its new home. This tutorial assumes you have used the suggested defaults.
Important If the first Atom 2 plugin (the “controller” plugin) is active then you will not hear any sound when you play the in-built keyboard or if you send MIDI in to the track. The plugin does not pass notes through because you do not want to hear the incoming controller MIDI interleaved with your song notes. You must bypass the controller plugin to preview notes from the selected instrument.
Save initial setup
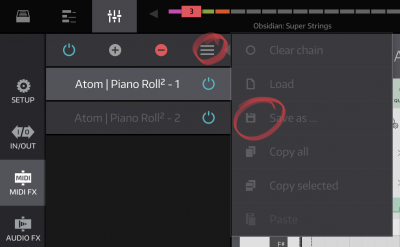
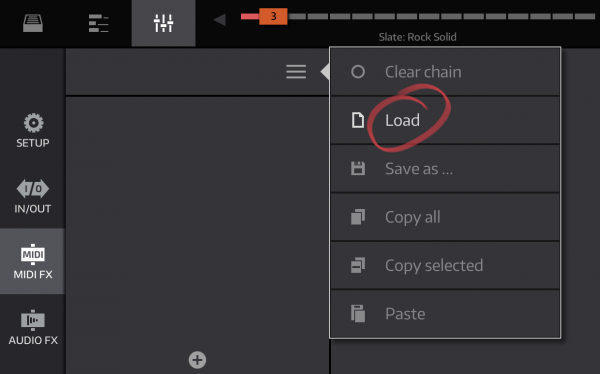
Before creating any music, and to speed things up when creating new tracks, it would be a good idea at this point to save the MIDI FX chain. This is a feature of NS2 which saves the state of all of the defined plugins. Here is the menu option:
Note The loaded plugins will inherit all settings, including the track number. I do not know what the side-effects are if there are two plugins with the same identifier so it is probably best to modify the track number after loading so that it is unique across the set of Atom plugins in other NS2 tracks.
Testing the configuration
Creating the control notes
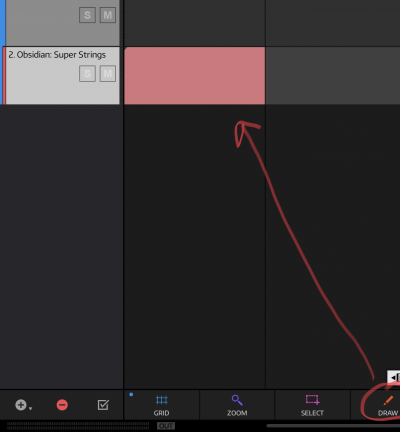
Draw a new MIDI block for the track hosting your Atom 2 plugin:
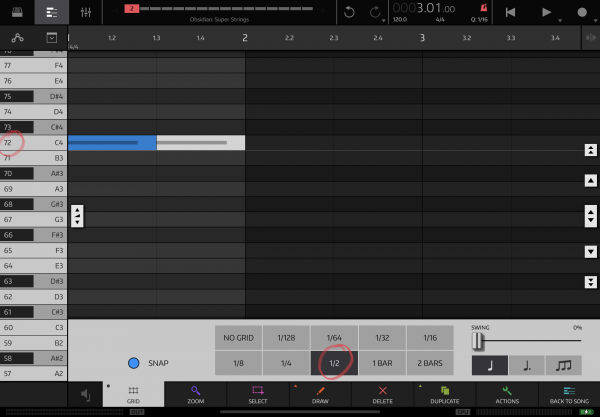
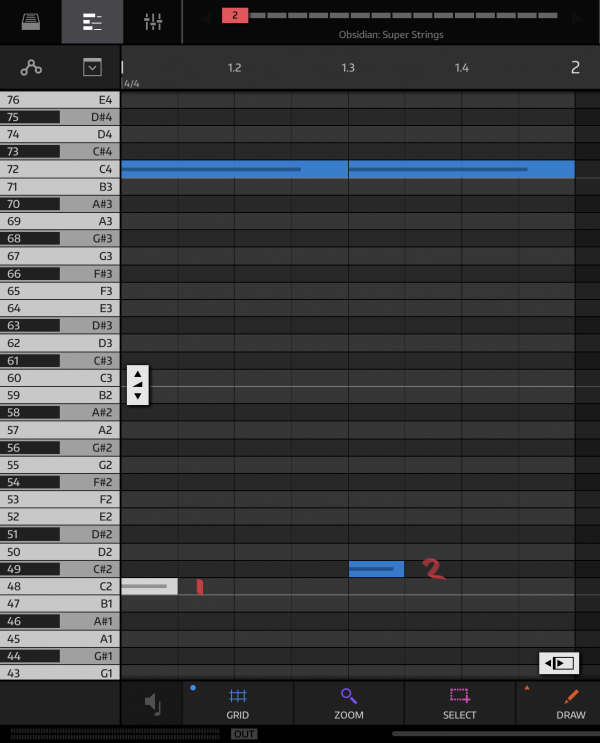
Open the piano-roll by double-tapping the new clip. We are going to create two patterns to be triggered, each half a bar long. Our trigger note is C4 (72) and so we need to draw two half bar notes:
TIP: You can use the GRID menu at the bottom of the screen to snap to 1/2 bar notes to make drawing these easier.
These notes will trigger the Hold mode in Atom 2. While the note is held down then Atom will move its playhead forward, from the start of the playing clip. We now need to add two pattern switch notes to change patterns at the half bar boundary:
We configured note C2 (48) as the “Root Offset” for changing patterns and so adding a note at C2 means that Atom 2 will switch to “Pattern 1” and play that for the duration that the trigger note C4 (72) is held down.
The second pattern switch note added is C#2 (49). This will cause “Pattern 2” to be switched to for the second instance of the trigger note C4 (72). Having the second trigger note C4 (72) forces the playhead to return to the start after switching to “Pattern 2”.
Important If a pattern change is not happening as expected then try removing the pattern change note and re-add it, or move it forward one step and then back to its original point in the timeline. For whatever reason, if you either move or delete/add the *clip* control note then you need to re-add the pattern change note. There is probably some order which NS2 presents the notes to Atom which gets messed up by moving/re-adding the control note.
Note The pattern switch notes mark state changes and so the length of those notes is not significant.
Creating the patterns
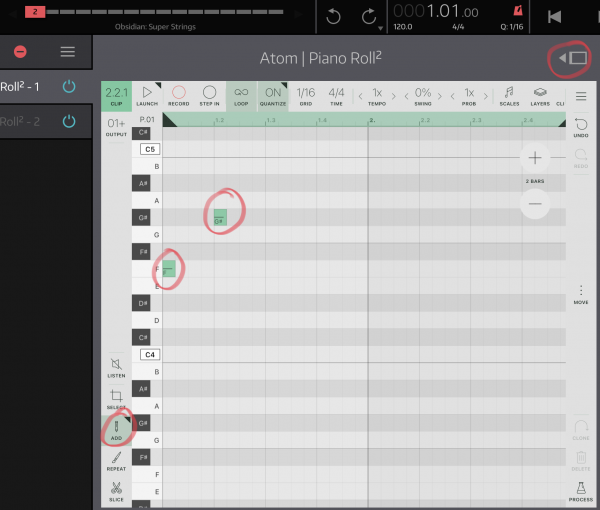
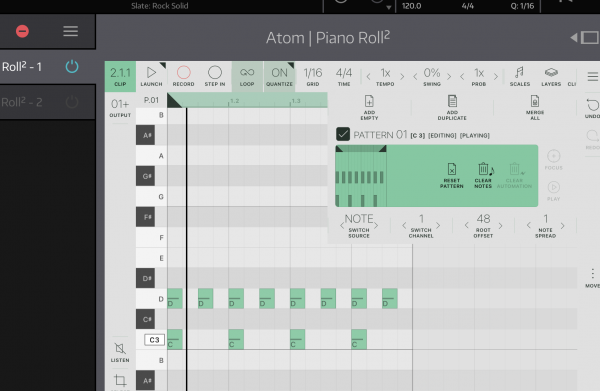
We want to create two patterns, each of which are a half bar in length. Open the first Atom 2 instance associated with the track in NS2. Select the manual draw tool and add a couple of notes that fit within the first half bar of the default pattern:
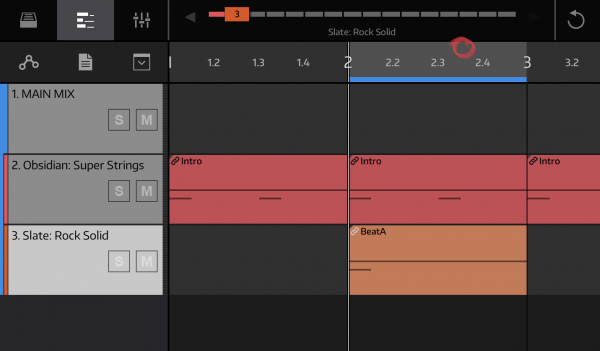
TIP: You can expand the plugin width by clicking on the button circled in the above image.
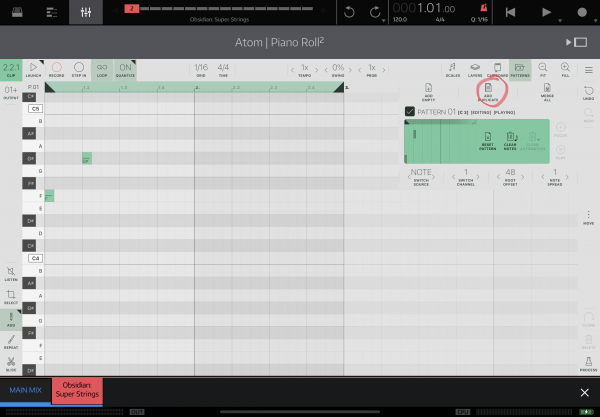
Open the Atom 2 “Patterns” menu. You may need to scroll the top menu pane to the right, or alternatively expand the plugin width. Click on “ADD DUPLICATE” and a new pattern will be created that contains the same notes as you just created:
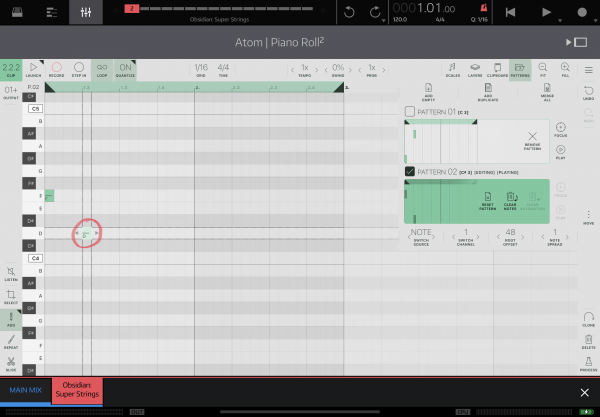
You will see that this has a different trigger note assigned to it. Edit this pattern in some way. Here I have moved the second note down a few semitones:
Playing the music
We have now defined two patterns and some controller notes to trigger those patterns. Make sure that the NS2 playhead is reset and hit play. You should hear the first pattern play for half a bar, followed by the first half a bar of pattern two.
Try opening the Atom 2 plugin and watch the patterns change as each trigger is hit.
Repeating the music
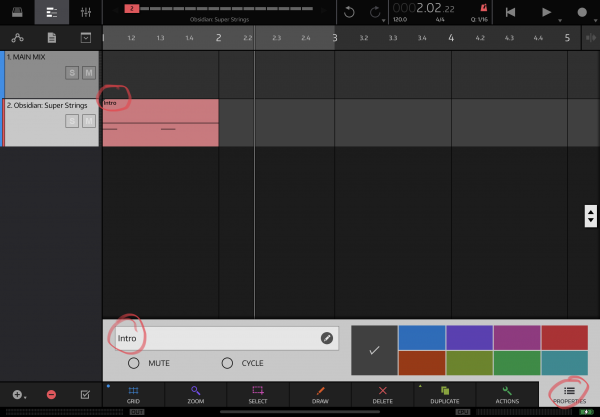
Let’s extend the usefulness of this clip by giving it a name and repeating it a few times. First we will name the clip using the “PROPERTIES” option at the bottom of the screen:
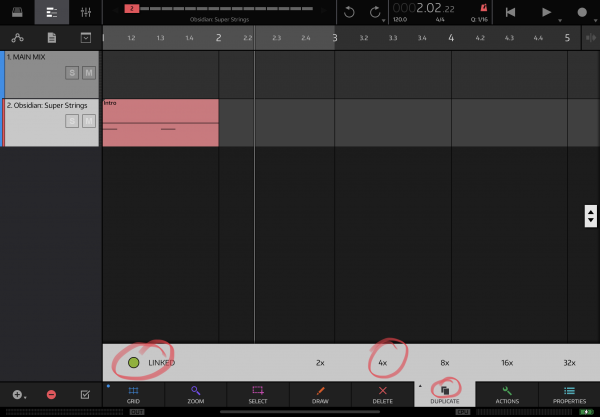
Our “Intro” clip now needs to be repeated four times. You can duplicate the clip but NS2 offers a more powerful option which is to create a linked clip. Linked clips are a special type of duplicate where all copies change when one changes. To create a linked clip, long press on the “DUPLICATE” option at the bottom of the screen. A menu will appear where you can select “LINKED” to create a linked clip and also 4x to create a total of four copies of the clip:
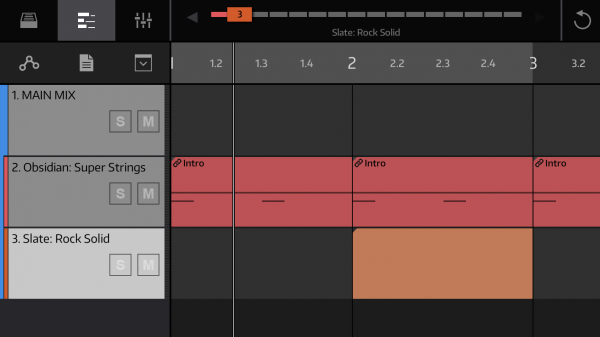
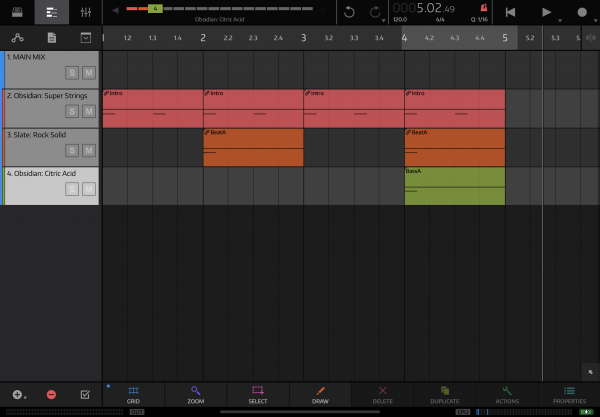
Here are the duplicated clips, note the little link symbol to indicate that they are linked:
We now have a four bar intro made up from clips, each containing two half bar patterns. If you reset the NS2 playhead and hit play then you will hear clip repeated four times.
Changing the music
We decide that we do not like the order of the patterns within the bar. If all of our song data was stored on the timeline then we would need to move multiple notes around and hope that we do not make mistakes. If we were using a DAW which did not have linked clips then we would need to ensure every copy of the clip in our song contained the new note ordering.
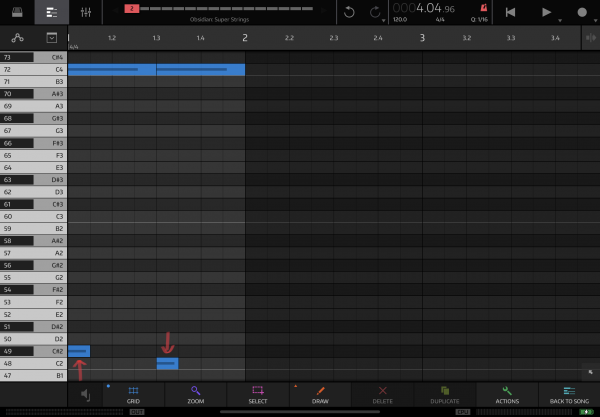
Using Atom 2 and NS2, changing the order of patterns is as simple as moving two notes. Open any of the linked clips and change the pattern switch notes so that the first one is now C#2 (49) and the second is C2 (48):
Now, if you open any of the other linked clips you will see that they all contain your new change.
If you play the song now then you will hear that the order of the patterns has changed each time the linked clip is played.
Adding a second track
The work we did with the first track to save the Atom configuration in a MIDI FX chain preset means that it is quick to set up a new track. In this part of the tutorial we will add a Slate track with a basic beat.
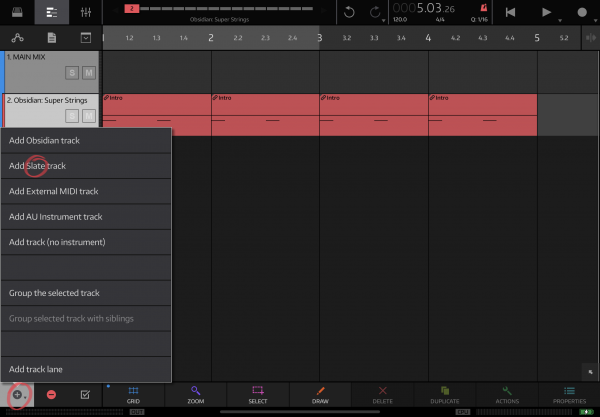
Create a Slate track:
Load the MIDI FX chain preset that you saved at the start of the tutorial:
The two Atom plugins will be loaded with the basic configuration ready to use. Important you should now change the Atom track number used in both plugins so that the plugins for this new NS2 track uses a different Atom track number to the other NS2 track:
For the first track we created the controller MIDI clip first. This time we’ll do it the other way and create the music inside Atom 2 first. Using the manual edit tool, create a simple single bar kick + hi-hat sequence using the notes corresponding to the Slate instrument loaded for this track:
To preview the clip before adding the controller MIDI clip you can temporarily enable the LAUNCH button and then hit play in NS2. In this mode the clip will simply loop with the rest of the song playing in the background.
We now need to add some controller data to trigger our pattern. Since we are only triggering a single pattern then this is more straightforward. Create a one bar MIDI clip on the Slate instrument track, starting at bar two:
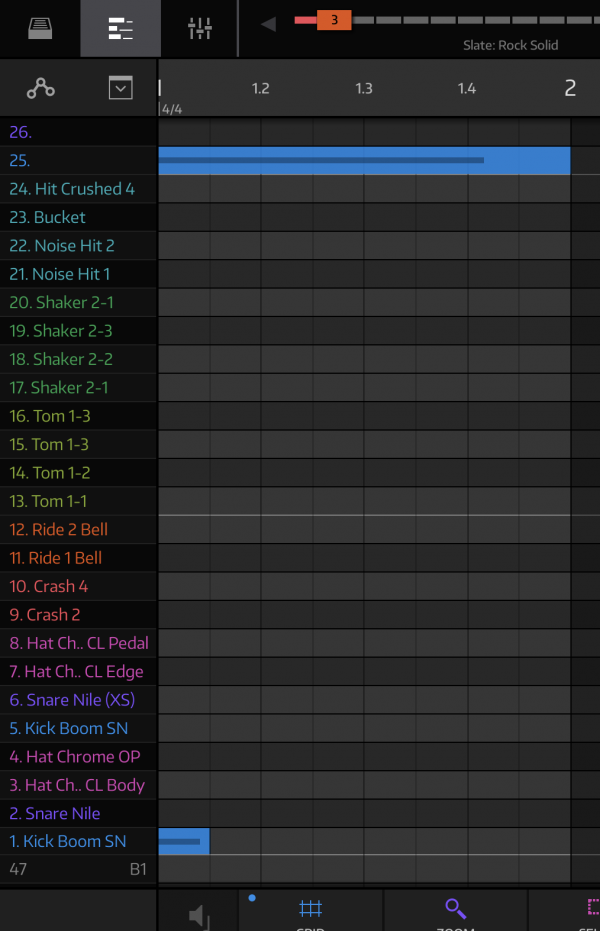
Open the clip. The first thing you will notice is that since this is a Slate track then the notes have been replaced by Slate instrument names. Fortunately the default pattern switch trigger values start where the default Slate notes start and end so it should be straightforward to find the correct notes. TIP Zoom in and you will see the note names and numbers:
Here we have added a single note spanning the whole bar for the control note at C4 (72) and the single pattern switch trigger at C2 (48).
Now if you start the song again you should hear your new beat kick in from bar two.
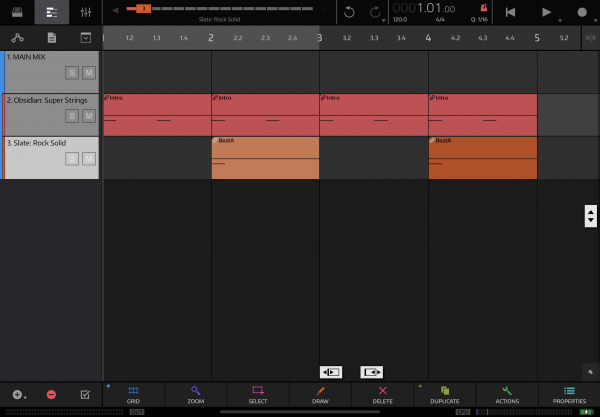
Using the techniques described earlier, give the clip a name and DUPLICATE it x2. Drag the second clip so that it starts at bar four:
Now if you play the song through then you will hear your beat appear in the second and fourth bars.
Creating patterns over a loop
You are likely to want to create patterns with other tracks looping underneath the one you are working on. You should first understand that there is a bug in NS2 where it does not cope with a perfect loop if your control note is the first thing in the loop, as it would typically be. Try looping bar two for example by double clicking on the timeline to enable looping and then dragging the start and end of the loop so that it is exactly one bar:
If you hit play now then you will hear a perfect loop the first time but for every loop following this, only the second pattern inside the non-Slate track will trigger since that is the only pattern which does not begin at the same time as the start of the loop.
To workaround this problem you should make sure that the loop starts just before the bar(s) you want to loop over, for example I have used the GRID option here to drag a 1/32 note back from the start of the bar:
Now that we know how to reliably loop we can start adding a new bass part starting at bar four. We have already seen how to do all of these, so do the following to create a third track:
- Create an Obsidian track with a bass sound
- Add our default Atom MIDI FX chain, remembering to change the track number.
- Loop the whole of bar four, remembering to start the loop just before the start of bar four
Important Hold off creating the controller data for the new track because we want to get the notes down in Atom 2 first and do not want the controller data bleeding into our recording.
Rather than opening the controller Atom 2 plugin, open the second instance of the Atom plugin that we will use only for recording. The controller plugin is set to not pass through notes so in order to record anything to the recording plugin then we will need to disable the controller plugin otherwise it will eat the incoming notes:
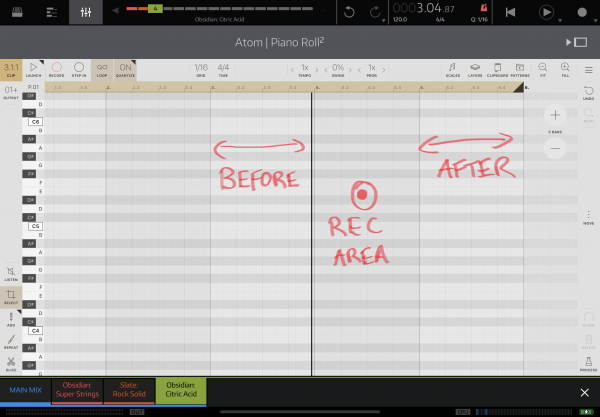
Start the NS2 transport and open your recording plugin. You will see the playhead moving relative to the main timeline and will start just before a bar boundary (our loop starts just before a bar boundary, remember). The next part is important as it will mean the difference between a successful loop and a loop that goes off in seemingly random directions.
- Hit the “return to start” NS2 transport control to position the playhead at the start of your loop. If it takes you back to the start of the song then hit it again and you should find it takes you to the start of the selected loop.
- Make a note of where the playhead is in your recorder Atom 2 plugin.
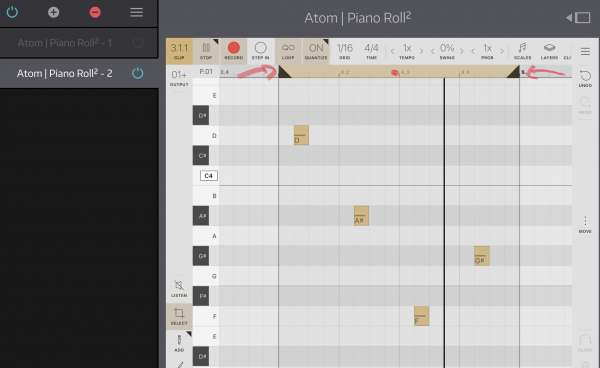
- When you add bars to Atom 2 then you will see that the playhead moves so that it starts at some multiple of the current song position in the main host timeline. Add bars to the Atom 2 timeline until you have at least one bar before the playhead and at least one bar after the number of bars you are recording. In this example, we are recording one bar so we want to see something like this:
- If you find that at any point the Atom 2 playhead seems to have got stuck at the start of the Atom timeline rather than correctly following the loop then do the following:
- Disable the loop in NS2 by double tapping it
- Play the song in NS2 from the start, just for a second or two
- Re-enable the loop
- You should now find that the playhead in Atom returns to the correct place
In the scenario created here the Atom 2 timeline happens to match the NS2 one since we are only at bar four but if we were looping at some much larger bar value then the same process will apply, just keep adding bars until you have enough clear bars either side of the one you are about to record to.
Hit play in NS2 and you will see the playhead loop around your recording area in the Atom 2 timeline. At this point you can start practicing over the other two tracks of music being played. You can do this by switching to the built-in keyboard for the track being edited, or by attaching an external keyboard and sending data in via the usual NS2 MIDI IN/OUT configuration screen. Another source might be a MIDI app before Atom in the MIDI chain, or some other MIDI generator hosted elsewhere and pointed at an NS2 MIDI port. You could even use the Atom 2 piano on the left hand side of the plugin to pick out simple riffs.
When you are ready to record, simply hit “RECORD” in Atom 2 and then hit play in NS2. Any incoming notes will now be recorded to the Atom 2 timeline.
If you want to manually enter MIDI then zoom in on the loop area and simply paint and move notes until you have something you like the sound of with the other tracks playing underneath.
TIP: If you are recording a piece with notes that fall near the end of the bar(s) being recorded then it is a good idea to extend the NS2 loop to some point just after the section being recorded. Doing this will allow you to record any tails or notes that fall just outside the bar. You may then decide that the one bar recording should actually be a 1.5 or two bar recording, or perhaps simply tidy up any overhanging notes.
Transferring recorded patterns
When you are happy with your new bar of notes then we need to move them to the controller plugin.
The first thing to do is double-tap the Atom 2 plugin timeline between the bar we just recorded. This will change the Atom 2 loop so that it just covers that bar:
If you have recorded more than a bar of music then drag the loop to the correct length.
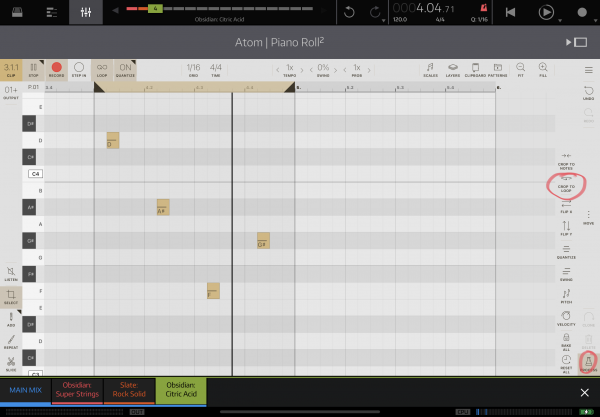
Now you need to use the PROCESS → CROP TO LOOP function which will take the looped section and remove everything else in the Atom 2 timeline:
The notes are now ready to transfer to the controller plugin.
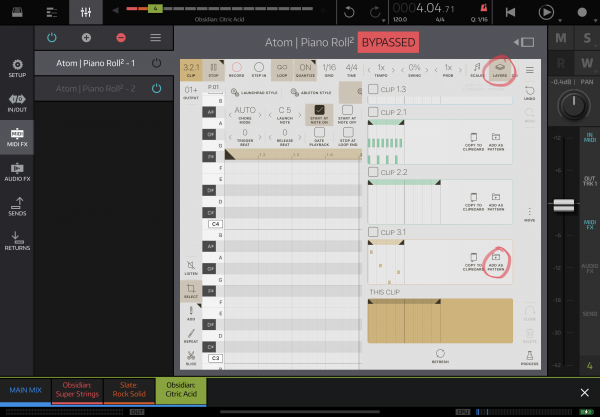
Open the controller plugin and go to the LAYERS menu. You should see the pattern you just created in the recorder plugin instance. If you do not then hit the refresh button at the end of the list:
Tap “ADD AS PATTERN” and then open the PATTERNS menu. You will see that your new pattern has been added to the controller pattern list. Remove the initial empty pattern so that the only one in the list is the one we just added:
Your controller plugin will play your new pattern once the controller MIDI has been created. To do this:
- Create a clip starting at bar four on the bass track and which extends for the duration of your recorded pattern.
- Create the MIDI controller data to trigger pattern one and hold for the duration of the clip.
Important Do not forget to bypass the recording plugin and re-enable the controller plugin once the controller MIDI has been created.
You can now play the song through and should hear all patterns being triggered at the correct times.
Mixdown
One of the great things about using Atom 2 in the way described in this tutorial is that mixdown works in the same way as it would do as if the notes had been recorded directly into the NS2 MIDI timeline.
Advanced Topics
Recording MIDI
To record MIDI from Atom you will need the excellent MIDI Tools app https://apps.apple.com/gb/app/midi-tools/id1446209019
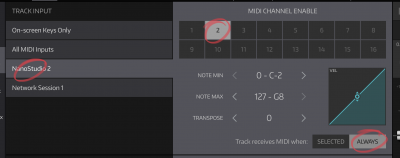
Decide where you want the recorded notes to be sent to. This might be a new track which sends to the instrument track, or might be the instrument track itself. When you have decided where the notes are to be recorded then ensure that the track is listening on a specific “NanoStudio 2” channel which is only used by that track. Set the track to receive MIDI “ALWAYS”, for example:
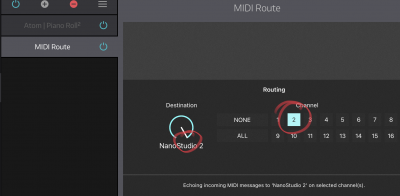
Add the MIDI Route plugin after the Atom instance that you want to record:
I think by default the plugin will point to NanoStudio 2 so all you need to do is ensure that the MIDI channel that is being sent to matches the MIDI channel of the track you set up above.
Hit record in NS2 and the output of Atom will be routed by MIDI Route to the NS2 channel and recorded into the track listening on this channel.
If you are using an iPhone then MIDI Route is not available but you may be able to use this workaround:
Alternative (better?) workflow
Since writing the initial version of this guide I have changed my workflow so that every instrument has a control track which contains a single Atom instance - no secondary Atom instance is used for recording. This control track does a MIDI send to the instrument track. The control track is set up as a dummy Slate instrument - see below on how to set this up. This lets you have a nicely numbered piano roll where the numbers match the patterns in Atom. The instrument track is set to listen on its own MIDI port and so you can hear both the notes as played by Atom as well as an external controller.
To record I set up a blank pattern in the control track Atom instance and loop the part of the song I want to record over. I then open AUM and record into Helium or Atom attached to the NS2 port for the instrument I want to record for, which lets me hear exactly how the recording will sound and has the advantage of being able to hear the lead in bars for that instrument. If you have LINK enabled in AUM/NS2 then you can set up a loop to record over in Atom/Helium and it should be in sync with NS2. A current advantage of using Helium is that you can use the multi-take feature to try a few different ideas out.
Tip: To quickly get a recording from Helium to NS2/Atom - save to the Media Bay, long press on the new MIDI clip and with your finger held down, use the other hand to navigate to the Atom instance in NS2 containing the empty pattern you set up earlier. If you now release your finger you should see that the clip is pasted directly into the empty pattern, meaning you can avoid the need to export/import via the file system. If the number of bars was set up correctly in Helium then the clip you imported should fit exactly into your song with no further editing required.
Using Slate to trigger patterns
As you saw earlier, Slate kits allow you to name pads and these names appear in the piano roll. Using this information we can create a simple Slate kit that does not actually contain any sound but can be used to more easily add patterns to controller clips.
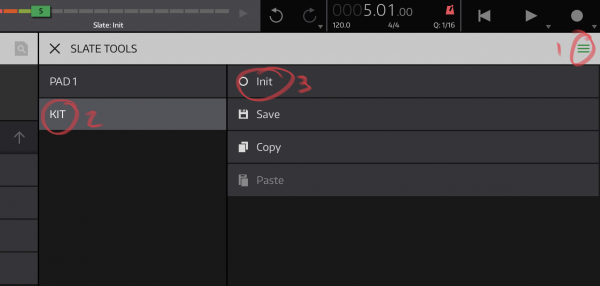
Create a Slate track and then create an Init kit in the Slate editor:
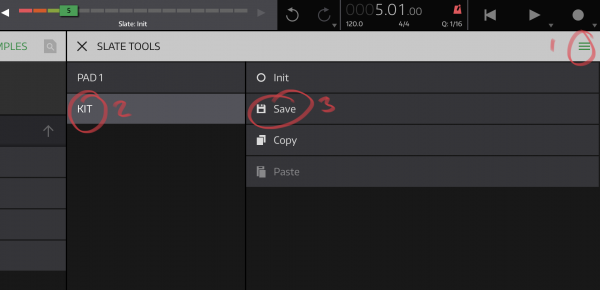
Save the empty kit using a different name:
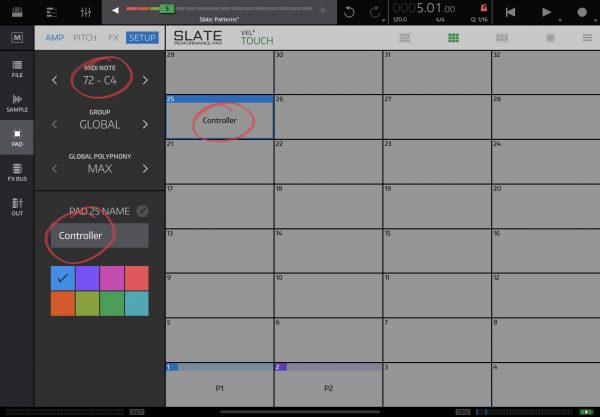
Now you can assign useful names to the notes, or just label the controller as the others will automatically be numbered. Pad 25 should be labelled as the controller note as this is by default C4 (72). If you used the suggested default “Root Offset” setting then you will find that this starts at pad 1 which defaults to C2 (48):
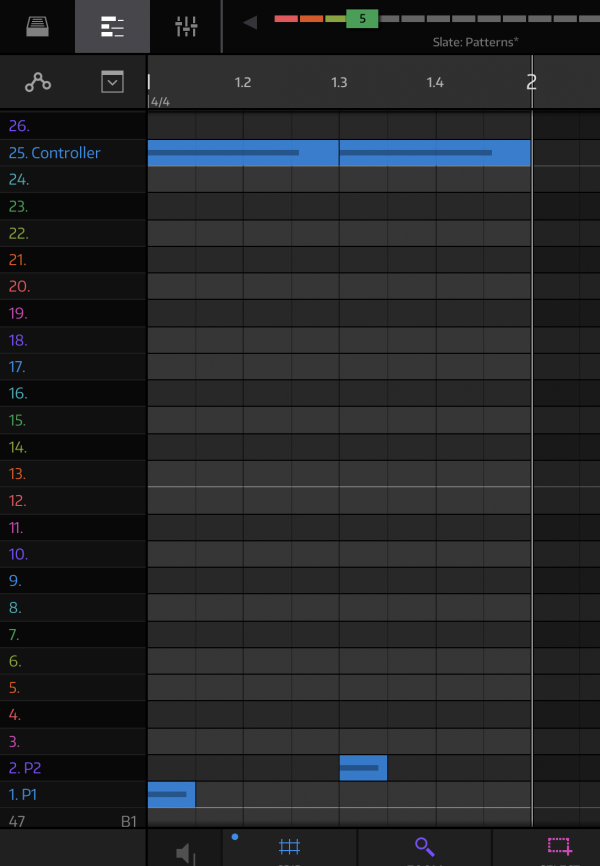
If you look at an NS2 MIDI clip under this track then you will see that the notes are labelled as a handy guide for adding the control notes and pattern switches:
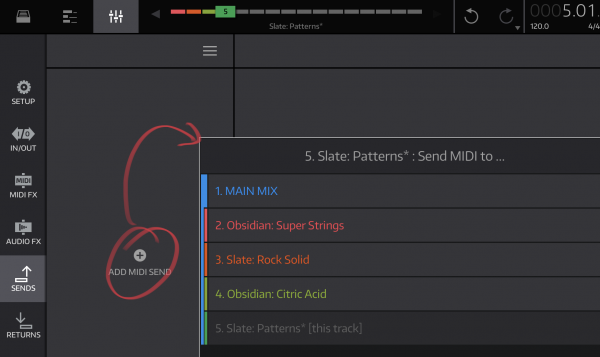
At the moment the control data is sitting on the Slate track and we need to use this to trigger Atom. At this point you have two options - either store your Atom controller plugin with the Slate track and send all generated MIDI to an instrument track, OR host the Atom plugin on the instrument track and send only the controller data from the Slate track. You route MIDI data in the usual way, either by grouping tracks or using MIDI Send from the Slate track:
