This is an old revision of the document!
Atom 2 and NS2
Why use Atom 2 and NS2?
NS2 already provides one of the best interfaces for arranging a song. Using a high level zoomable view of your song you can easily manipulate clips of MIDI on a timeline. Adding Atom 2 to NS2 means you can harness this superior song arrangement capability and combine it with the superb clip launching and MIDI editing capability of Atom 2.
* Reuse of musical phrases in your timeline. Your musical phrases are stored as patterns and your song is built by starting these patterns. If you don’t like a phrase which is repeated 20 times in your song you change it in one place and it automatically changes everywhere else. I only want to store one copy of my chorus and I also only want to store one copy of the music that makes up my chorus and Atom makes that possible, even inside a DAW. All my DAW does now is arrange when things start and end, the music is decoupled from the timeline.
* Ability to quickly try different phrases together. When you write a phrase you are throwing together notes that you like the sound of. When you arrange a song then you are throwing together phrases that sound good in a particular order. Clip launching lets you experiment with this in a much more free way than shifting bits of MIDI around a timeline.
The utility provided by NS2 clips means you can store whole named sections of clip launch instructions together logically and move them around the timeline. You also benefit from the ability to alias clips so you can have one clip that can be repeated throughout your song yet you only need to change one of the clips to change them all. This way you really are repeating the minimal amount of data to arrange your song.
Adding Atom 2
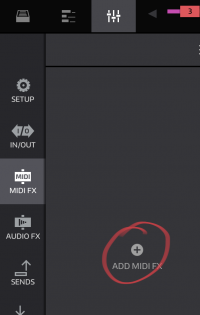
You should add Atom 2 as an External MIDI FX plugin:
If you intend on recording MIDI rather than manually adding notes in Atom then I recommend that you create a second instance of Atom 2 for each track. This will be explained in more detail later on but you will use the second instance for recording and the first for triggering:
Initial setup
You can trigger Atom 2 patterns in a number of ways. NS2 limits the usable trigger methods to velocity and note since program change and continuous controller MIDI are blocked by NS2. For the purposes of this tutorial we will use note triggering as it is not easy to accurately set velocity in NS2.
Open the first Atom 2 instance and set it up so that it looks like this:
How you set “Launch Note” and “Root Offset” is up to you. With the suggested configuration, “Pattern 1” is triggered by NS2 keyboard note C2 (48) and the trigger note is set to C4 (72). Due to octave naming differences, these are labelled C3 and C5 in Atom 2. I chose this range for the following reasons:
- It is nearer the centre of the keyboard
- It gives you access to 24 patterns per track
- It uses the same default range of notes as Slate (see Advanced Topics for how this may be useful)
If you typically use fewer patterns per track then use your own defaults but be aware that if you run out of pattern slots then you will need to edit all existing trigger MIDI notes on that track to move the controller note to its new home. This tutorial assumes you have used the suggested defaults.
Save initial setup
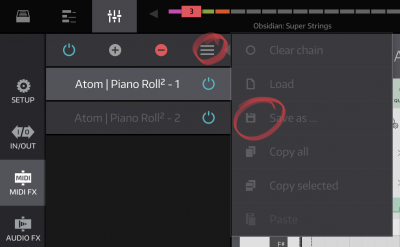
Before creating any music it would be a good idea at this point to save the MIDI FX chain. This is a feature of NS2 which saves the state of all of the defined plugins. Here is the menu option:
You can now load this initial setup to a new track. Note The loaded plugins will inherit all settings, including the track number. I do not know what the side-effects are if there are two plugins with the same identifier so it is probably best to modify the track number after loading so that it is unique across the set of Atom plugins in other NS2 tracks.
Testing the configuration
Creating the control notes
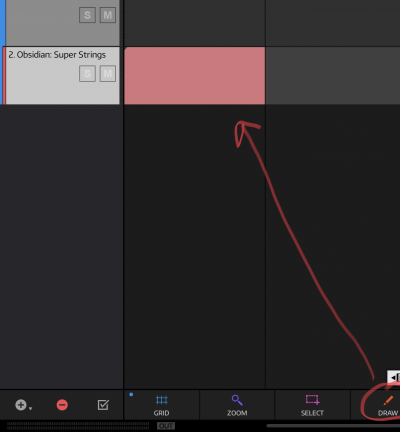
Draw a new MIDI block for the track hosting your Atom 2 plugin:
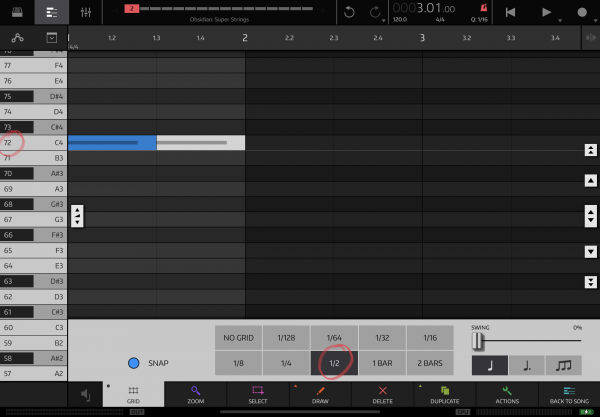
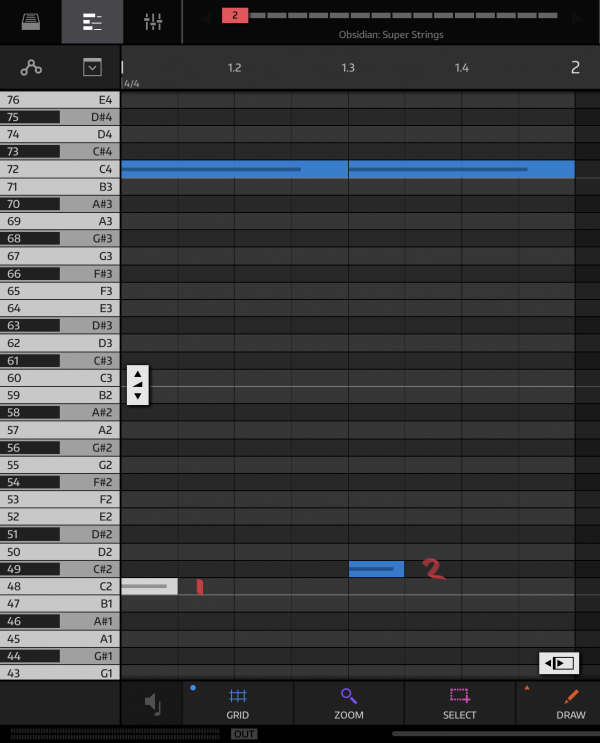
Open the piano-roll by double-tapping the new clip. We are going to create two patterns to be triggered, each half a bar long. Our trigger note is C4 (72) and so we need to draw two half bar notes:
TIP: You can use the GRID menu at the bottom of the screen to snap to 1/2 bar notes to make drawing these easier.
These notes will trigger the Hold mode in Atom 2. While the note is held down then Atom will move its playhead forward, from the start of the playing clip. We now need to add two pattern switch notes to change patterns at the half bar boundary:
We configured note C2 (48) as the “Root Offset” for changing patterns and so adding a note at C2 means that Atom 2 will switch to “Pattern 1” and play that for the duration that the trigger note C4 (72) is held down.
The second pattern switch note added is C#2 (49). This will cause “Pattern 2” to be switched to for the second instance of the trigger note C4 (72). Having the second trigger note C4 (72) forces the playhead to return to the start after switching to “Pattern 2”.
Creating the patterns
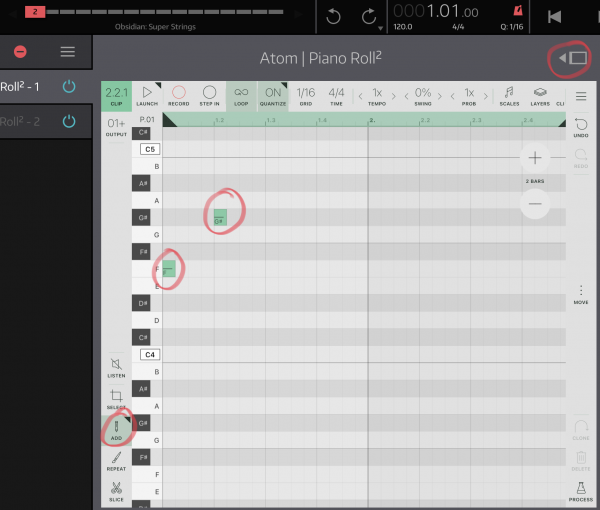
We want to create two patterns, each of which are a half bar in length. Open the first Atom 2 instance associated with the track in NS2. Select the manual draw tool and add a couple of notes that fit within the first half bar of the default pattern:
TIP: You can expand the plugin width by clicking on the button circled in the above image.
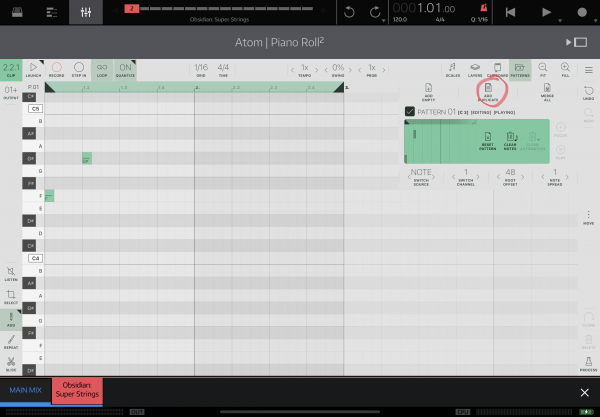
Open the Atom 2 “Patterns” menu. You may need to scroll the top menu pane to the right, or alternatively expand the plugin width. Click on “ADD DUPLICATE” and a new pattern will be created that contains the same notes as you just created:
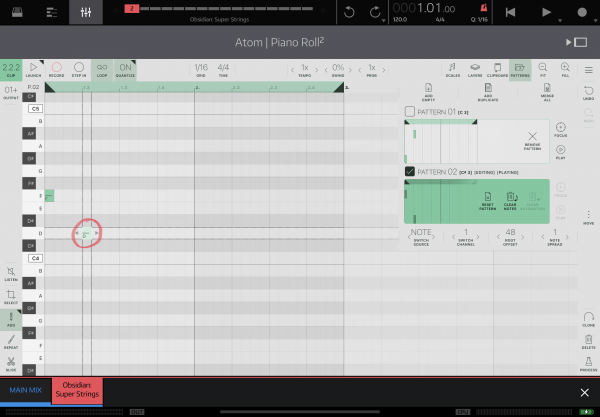
You will see that this has a different trigger note assigned to it. Edit this pattern in some way. Here I have moved the second note down a few semitones:
Playing the music
We have now defined two patterns and some controller notes to trigger those patterns. Make sure that the NS2 playhead is reset and hit play. You should hear the first pattern play for half a bar, followed by the first half a bar of pattern two.
Repeating the music
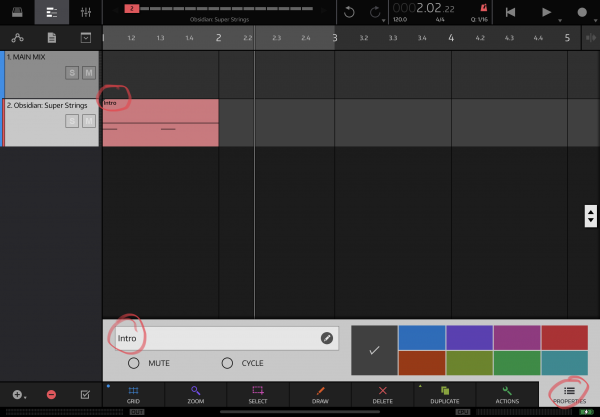
Let’s extend the usefulness of this clip by giving it a name and repeating it a few times. First we will name the clip using the “PROPERTIES” option at the bottom of the screen:
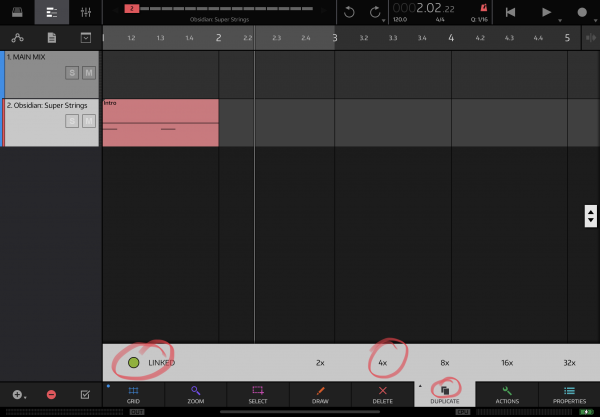
Our “Intro” clip now needs to be repeated four times. You can duplicate the clip but NS2 offers a more powerful option which is to create a linked clip. Linked clips are a special type of duplicate where all copies change when one changes. To create a linked clip, long press on the “DUPLICATE” option at the bottom of the screen. A menu will appear where you can select “LINKED” to create a linked clip and also 4x to create a total of four copies of the clip:
Here are the duplicated clips, note the little link symbol to indicate that they are linked:
We now have a four bar intro made up from clips, each containing two half bar patterns. If you reset the NS2 playhead and hit play then you will hear clip repeated four times.
Changing the music
We decide that we do not like the order of the patterns within the bar. If all of our song data was stored on the timeline then we would need to move multiple notes around and hope that we do not make mistakes. If we were using a DAW which did not have linked clips then we would need to ensure every copy of the clip in our song contained the new note ordering.
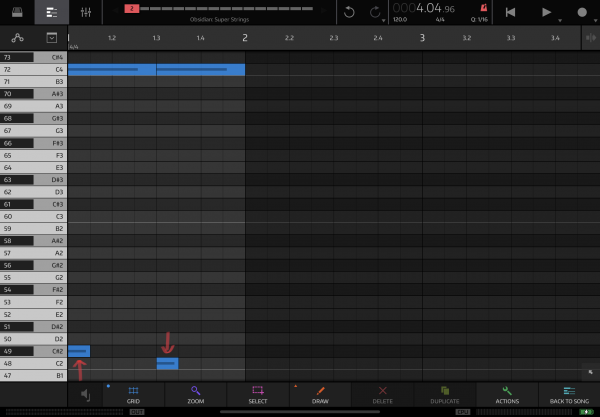
Using Atom 2 and NS2, changing the order of patterns is as simple as moving two notes. Open any of the linked clips and change the pattern switch notes so that the first one is now C#2 (49) and the second is C2 (48):
Now, if you open any of the other linked clips you will see that they all contain your new change.
If you play the song now then you will hear that the order of the patterns has changed each time the linked clip is played.
